User Guide
This guide walks through Trace Elements 2.0 one screen at a time. If you're just getting started, read it top to bottom — each section builds on the last. Upgrading from a 1.x build? Everything you know is still here; see what changed in 2.0.
On this page
- 1. First run & choosing your element
- 2. The home screen
- 3. Reading the daily ring
- 4. Logging a meal
- 5. Searching the food database
- 6. Looking up foods that aren't listed
- 7. Scanning packaged foods
- 8. Scanning a restaurant menu (Pro)
- 9. Managing the food database
- 10. Compound foods & custom recipes
- 11. Favorites, repeating & moving meals
- 12. Mood & notes journal
- 13. Trends & history
- 14. Settings, limits & backup
- 15. Pro & Tip Jar
1. First run & choosing your element
Out of the box the app tracks nickel with a daily limit of 150 µg, a common target for a low-nickel diet. You can change the limit at any time — see Settings. The element you track is shown under the daily ring, and every food value in the app is interpreted as that element measured in micrograms (µg) per 100 grams of food.
With Trace Elements Pro you can also track cobalt. Cobalt has its own daily limit (12,000 ng by default) and its own food database, and its values are shown in nanograms (ng) to match the published low-cobalt sheets. Switch between the two with the Nickel and Cobalt chips in Settings; whichever you pick becomes the outer ring, and the other keeps running as an inner ring.
Version 2.0 is a full rewrite, but it installs as a normal update. The first time it opens it copies your logs, foods, favorites, recipes, and settings across automatically and keeps the original data on the device. There is nothing to do.
2. The home screen
The home screen is your daily dashboard. From top to bottom it shows the date navigator, the daily ring, the meal selector, the Food Management panel, the meal card you're logging into, and the day's mood and notes. Links to this guide, the FAQ, Pro & Tip Jar, the data sources, and Legal & Disclaimer sit in the footer.
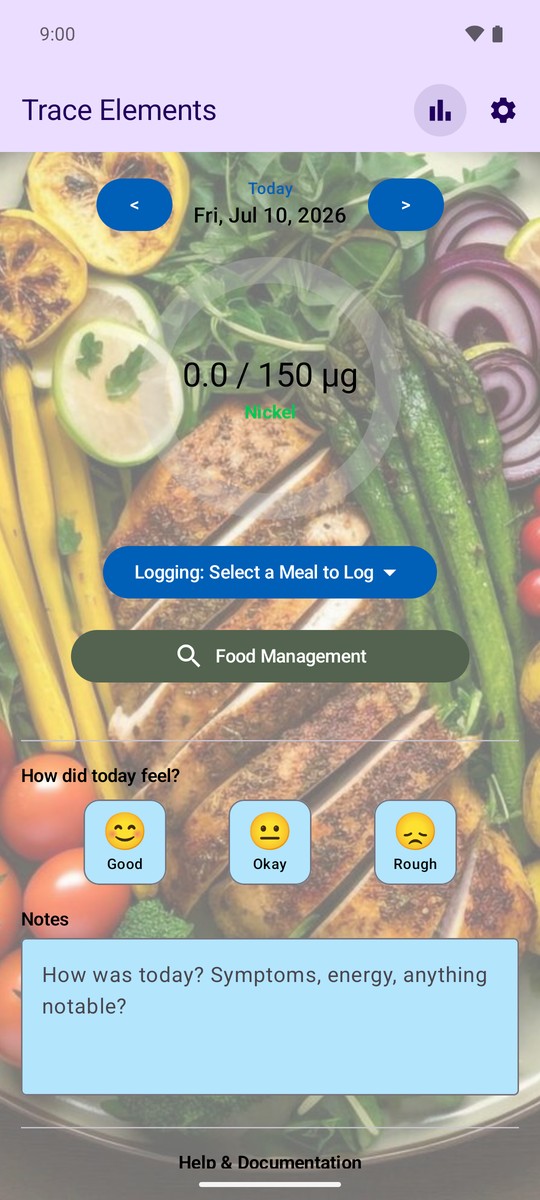
- Date navigator — use the < and > buttons to move between days. A cue above the date says Today, Yesterday, Tomorrow, or how many days away you are, so you always know which day you're logging.
- Daily ring — your running total for the day against your limit.
- Logging selector — pick which meal you are adding food to; its card opens below the Food Management panel.
- Food Management — an expandable panel for looking up and saving food values, building a prepared dish, scanning a product, and opening the full database and your recipes.
- How did today feel? and Notes — your personal journal for the day.
The icons in the top bar open Trends & History (the bar-chart icon) and Tracking Settings (the gear).
3. Reading the daily ring
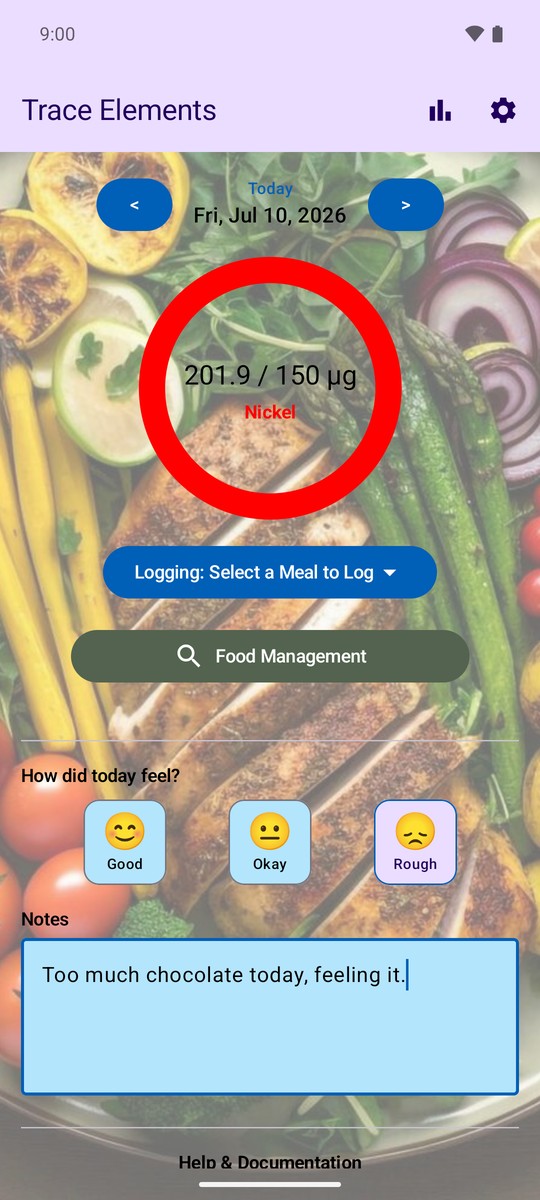
The ring fills as you log food and changes color to tell you where you stand against your limit. The thresholds are configurable in Settings.
The ring turns amber at your Caution threshold and red at your Over-limit threshold — 80% and 100% of the limit by default, both adjustable in Settings. Trends and the PDF report classify days by the same two thresholds, so the ring, the calendar, and the report always agree. In the example below the day has reached 181.5 µg against a 150 µg nickel limit, so the ring is red — and the day is tagged Rough with a note about what pushed it over. The green inner ring is the day's cobalt total, shown when Pro is active.
4. Logging a meal
- Tap Logging: Select a Meal to Log and choose Breakfast, Lunch, Dinner, or Snacks.
- In the meal card that appears, type a food name into the Food field. Matching foods drop down as you type — tap one to fill in its reference value automatically. Typing a name that exactly matches a database entry fills the value in too.
- Enter the Amt you ate and pick a unit from the menu beside it (grams by default; ounces, pounds, cups, tablespoons, teaspoons, milliliters, and pieces are also available). Piece sizes are per food, so 2 pieces of egg or banana weigh what they should.
- Tap the + button to add it. The food appears in the meal and both the meal total and the daily ring update instantly.
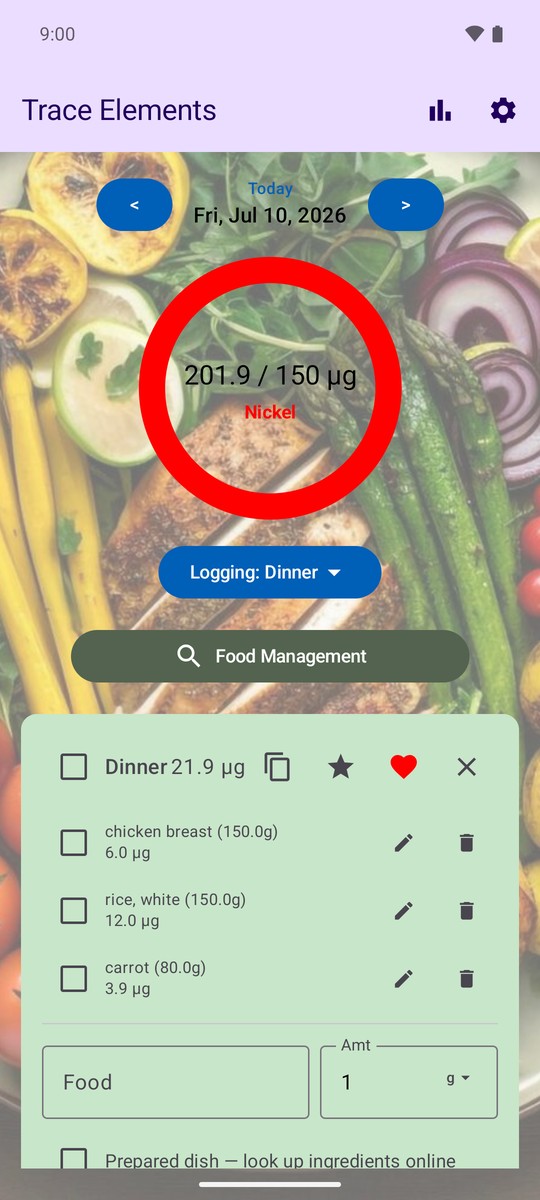
Each logged row has a pencil icon to edit the amount or value and a trash icon to remove it. The form also offers Compound dish — build from ingredients (see compound foods), Scan for a product barcode, and Scan menu for a restaurant menu. When you're done with a meal, tap the ✕ in the meal header to close it — your entries are saved automatically.
The value the app fills in is per 100 g. You don't have to do the math — enter the real amount you ate and the app scales the contribution for you.
5. Searching the food database
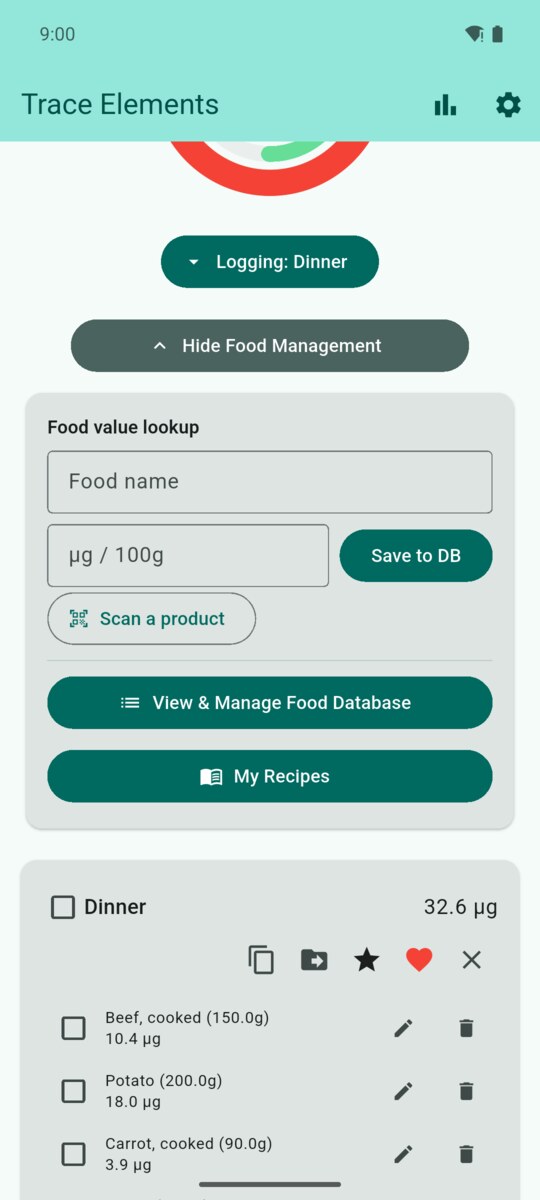
To look up a food's value without logging it, tap Food Management and use the Food name field. The app searches its built-in database, the built-in compound recipes, and any recipes you've created.
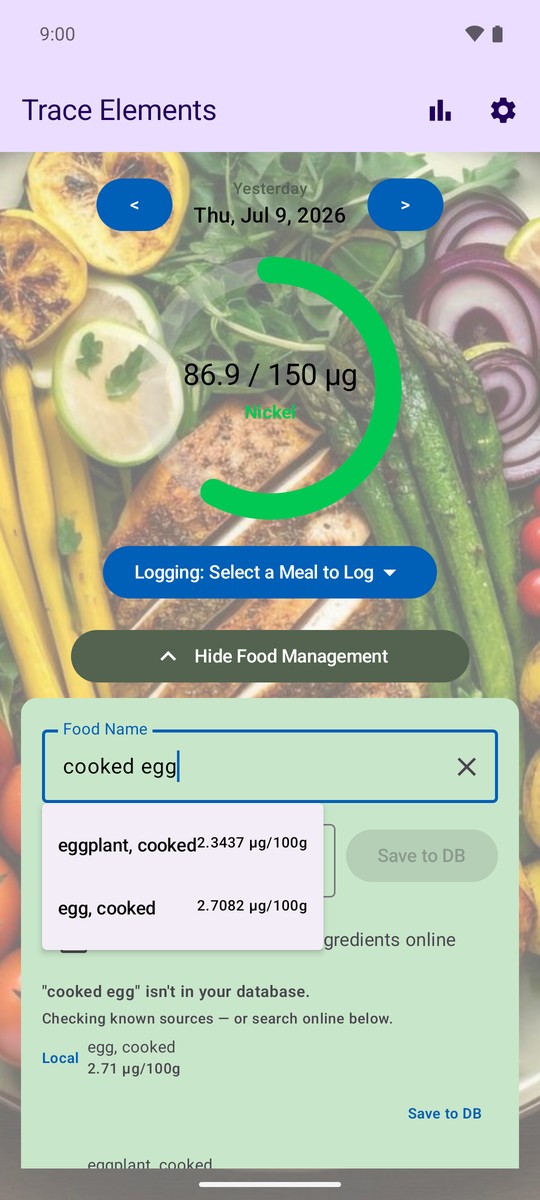
Each food is a single entry with one value, pooled and averaged across every measurement in the source data rather than split into a separate row per country — so the list stays short and readable. Search matches every word you type in any order, so cooked egg and egg, cooked both find the same food; exact and start-of-name matches sort to the top.
To save or correct a value yourself, type the food name, enter a number in the µg / 100g field, and tap Save to DB. Your value is stored for the element you're tracking and used everywhere that food appears.
6. Looking up foods that aren't listed
If you type a food that isn't in the local database — in a meal card or in Food Management — a look-up row appears under the field: "jackfruit" isn't in your food list yet. From there you can:
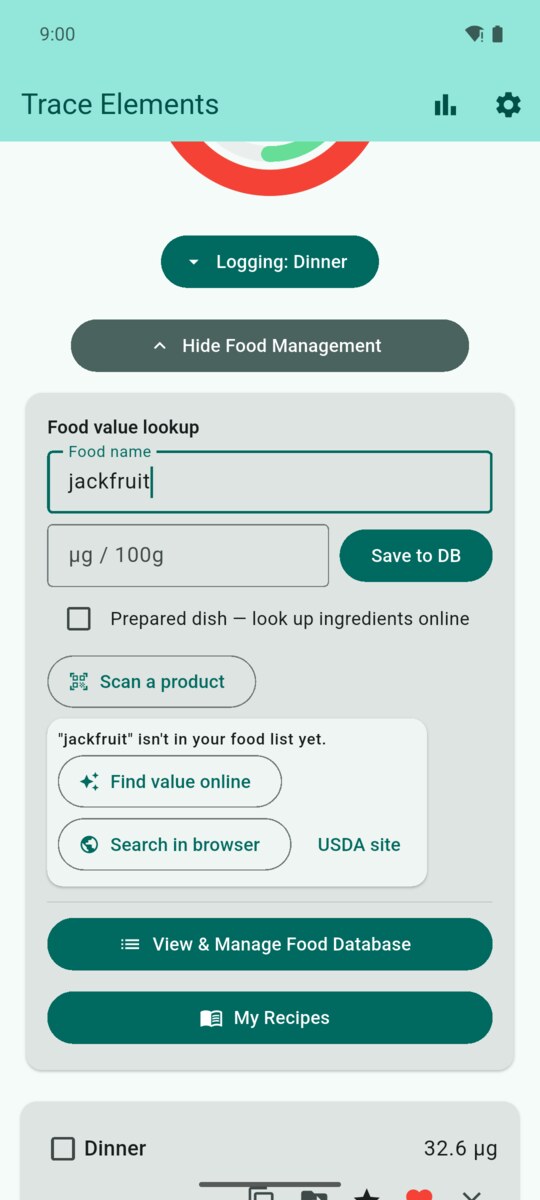
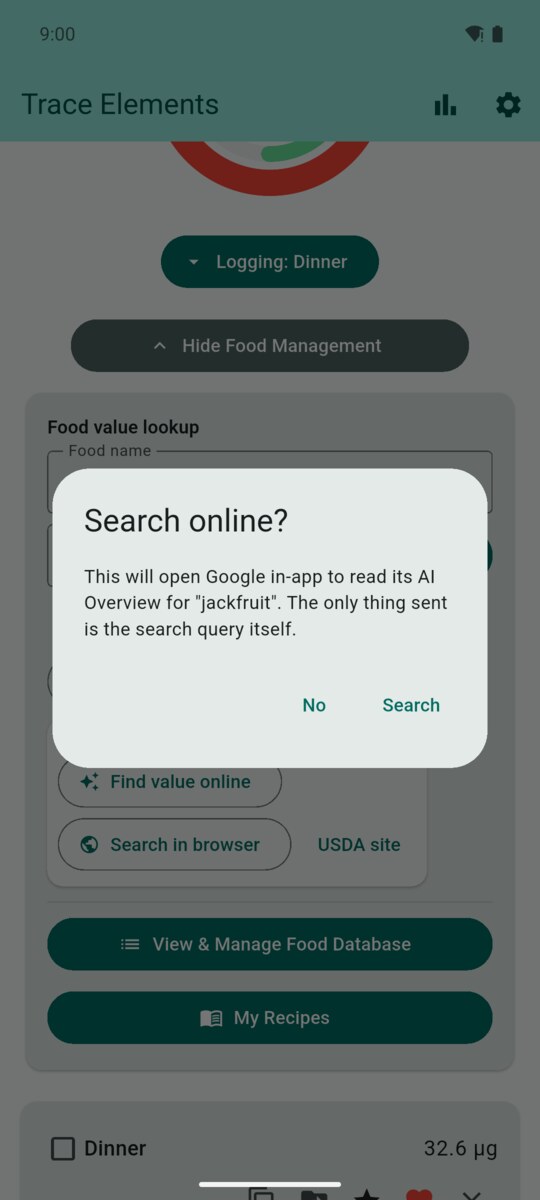
- Find value online — an in-app lookup that reads a value from a Google AI Overview. After you confirm, it runs the search more than once and only keeps a reading that sits next to both the tracked element and your food's name, so a figure for a different food on the same page is rejected. A reported range is treated as its midpoint, and alternate word orders are tried if the first wording finds nothing. When the readings agree it offers that figure, together with every reading and the exact sentence the value came from; when they disagree it lists them so you pick one (or none). A reading above the AI lookup verify-above value in Settings is set aside rather than counted: it can't confirm a value, the result lists it as ignored, and it is only offered — flagged in red — when nothing else was read at all. Figures that belong to a sentence about daily limits or intake are skipped outright. If nothing is found, a Search deeper button tries longer with more wordings. Use the eye icon to watch the page as it runs, or Stop to cancel.
- Search in browser — opens the same Google search in the in-app browser so you can read the results yourself.
- USDA site — opens the U.S. Department of Agriculture's FoodData Central search, pre-filled with your food. Builds that include a USDA key also show a direct Search USDA button that returns a value in place.
Whatever value you accept can be used for the meal straight away (Use) or written into your local database (Just save to DB), so the next time you type that food it's already there. Nothing is sent until you tap Search in the consent dialog — see privacy.
7. Scanning packaged foods
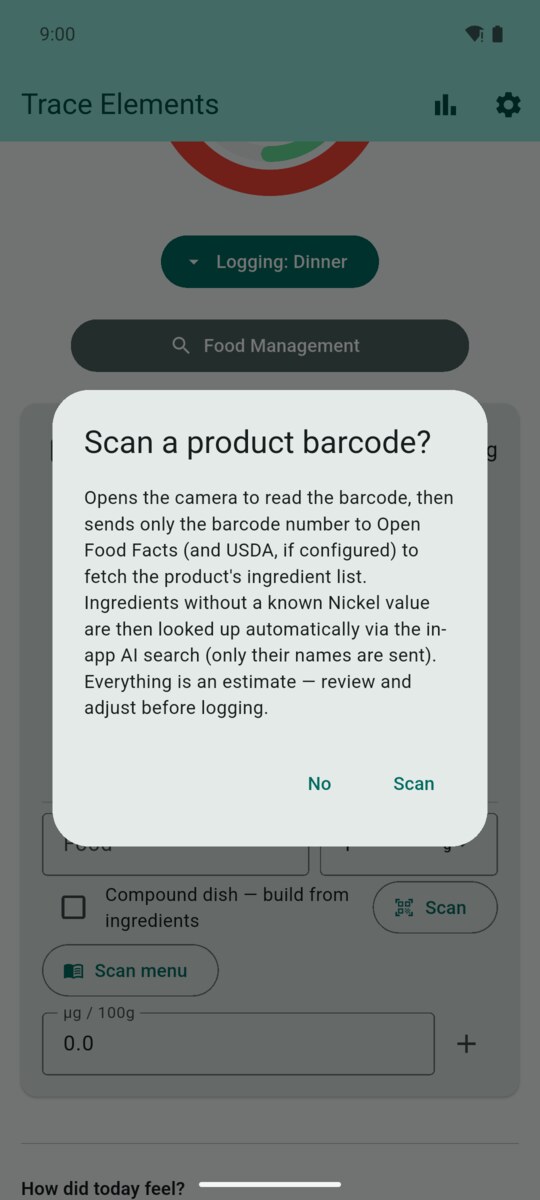
For store-bought products, skip the typing entirely: scan the package's barcode. In any meal card tap Scan; in Food Management tap Scan a product. A dialog explains what will be looked up; confirm, then point the camera at the code. The app fetches the product's label from Open Food Facts (with a USDA branded-food fallback on builds that include a key) and turns it into a compound food:
- Ingredients arrive pre-portioned. Packaged labels list ingredients by weight but rarely give exact quantities, so portions are estimated from the label's own composition data over one serving (or 100 g) — the first ingredients carry the most weight. Every row is editable before you log.
- Missing values are looked up automatically. Anything your database can't price goes through the in-app online search right after the scan — no extra taps, and only for the ingredients that actually need it. The scan consent covers this follow-up, so it doesn't ask again.
- Scans are remembered. The Save to My Recipes box above the Add button is ticked by default, so the product is saved to My Recipes linked to its barcode. Rescanning the same product later loads your saved copy instantly and offline, with whatever amounts you tuned. Untick it for a one-off.
Only the barcode number is sent to the product databases, and only still-unpriced ingredient names go to the value search — the consent dialog spells this out before anything leaves your device.
8. Scanning a restaurant menu (Pro)
Eating out? Tap Scan menu in the meal card. After you confirm the consent dialog, the camera opens: photograph the section of the menu with your dish. The text is read on your phone — the photo is never uploaded, and it's deleted as soon as the text has been recognized. The app then shows a Which dish? list of what it found; pick yours.
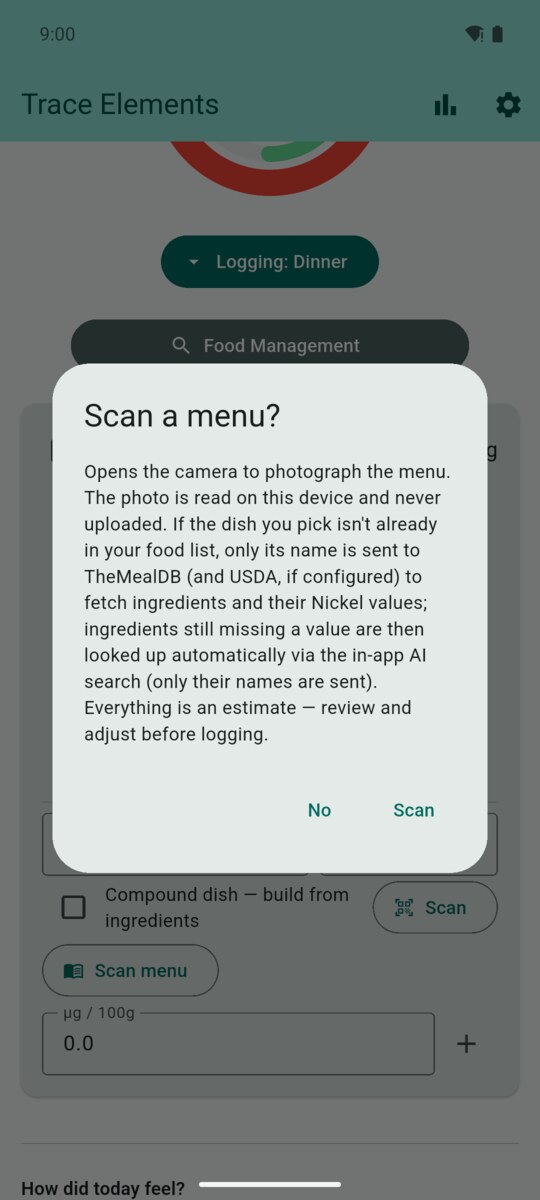
The dish is resolved in this order: your own recipes, then an exact match in your food list, then TheMealDB recipe database (only the dish name is sent), then the menu's own description words, then the closest match in your food list. The ingredients land in the compound builder with estimated portions, and any that still lack a value are looked up together automatically, exactly as after a barcode scan. Review and adjust the amounts — menu portions are guesses — then add the dish to the meal.
Menu scanning is part of Trace Elements Pro. Without Pro the button shows a lock and tapping it explains why. A close, well-lit shot of one menu section works best; if no priced dishes are recognized, try again closer.
9. Managing the food database
Open Food Management → View & Manage Food Database to see the full Manage Foods list. Every entry shows its name and value in µg per 100 g.
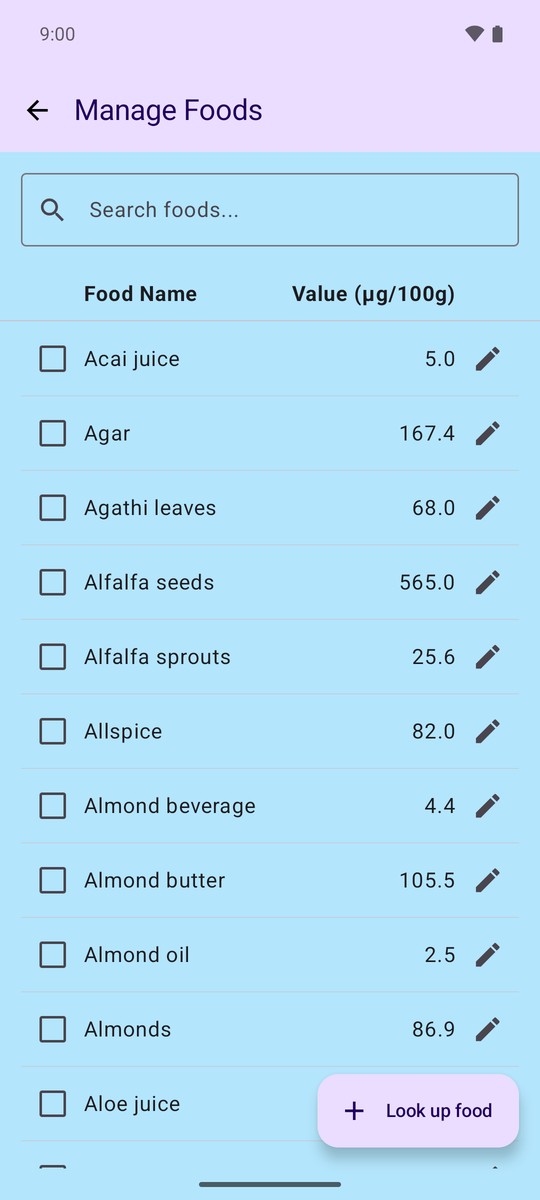
- Use the search box to filter the list as you type.
- Tap a row's pencil to edit it in place — rename a food or correct its value without deleting and re-adding it.
- Tick one or more checkboxes to select foods, then tap Delete Selected — handy for pruning foods you'll never log. Deletion is immediate, so check the selection first.
- Tap Look up food in the corner to look up and add a food — or a prepared dish — without leaving this screen. It's the same look-up panel described above, so a value you find is saved straight into the database.
The database is keyed to the element you're tracking. Values you add or edit are stored for the current element, so switching elements gives you a clean, element-appropriate list.
10. Compound foods & custom recipes
A compound food is a dish made of several ingredients. The app ships with recipes for many common items — type something like big mac, whopper, or turkey club sandwich and it breaks the dish into its ingredients and sums their values.
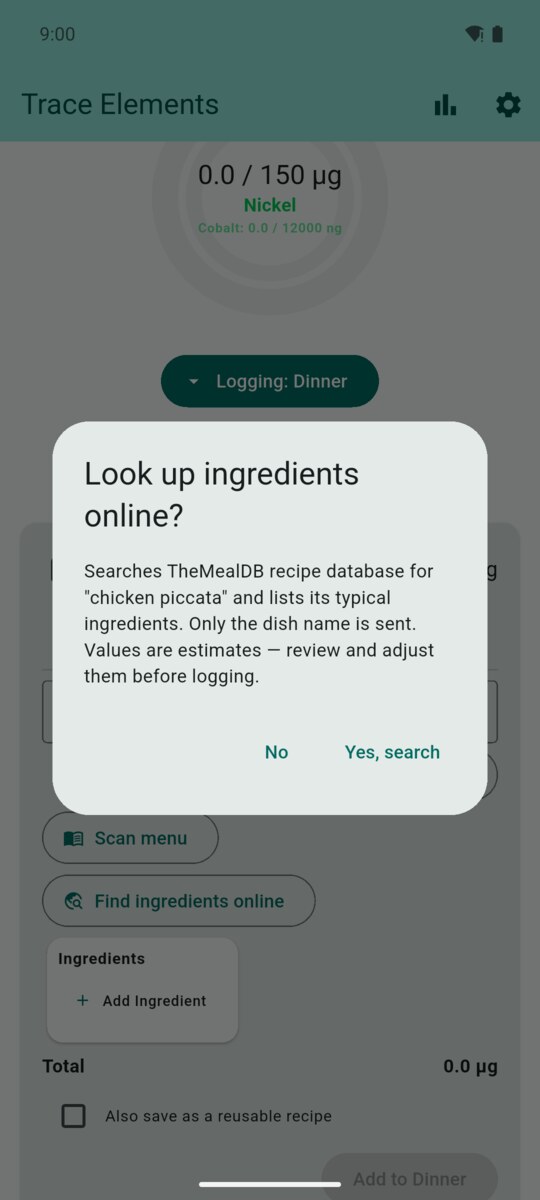
For a cooked dish that isn't in any recipe list, tick Compound dish — build from ingredients in the meal card. An ingredients card opens where you can add ingredients by hand, or tap Find ingredients online: after you confirm, the app searches TheMealDB for the dish (reworded names work too — wellington beef finds Beef Wellington), lists its typical ingredients, estimates a per-serving portion for each, and sums their values so you can review the total before adding. Only the dish name leaves your device — see privacy.
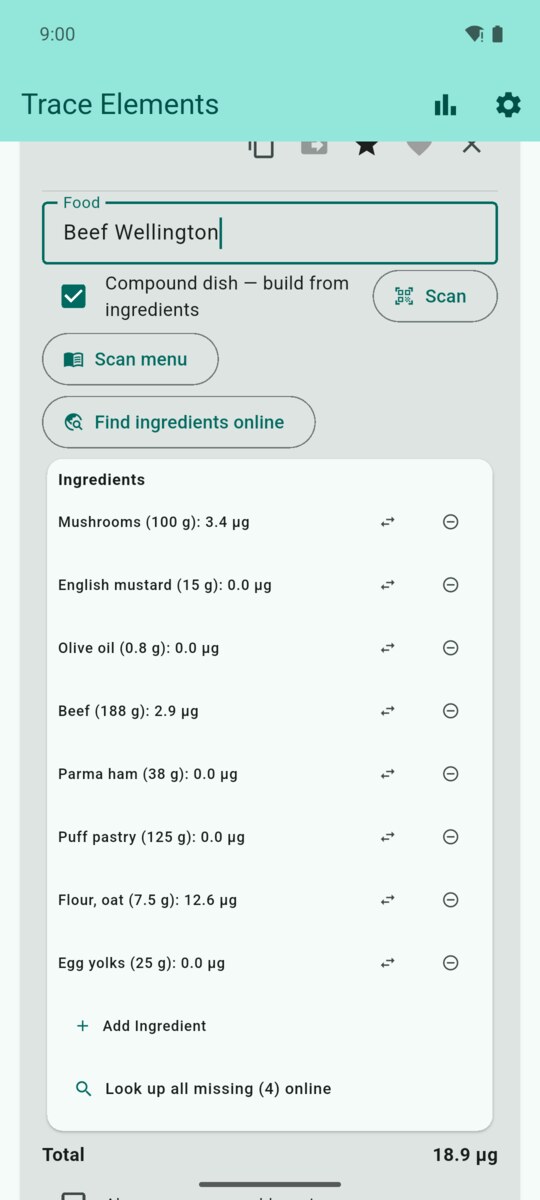
Every real ingredient is kept, even if the app can't price it — unpriced ones stay visible at 0.0 µg rather than being silently dropped. Tap Look up all missing (N) online to price the remaining ones from a single online search in one pass, with live progress and a Stop button; or tap an ingredient and fill in a value by hand. The same batch look-up is available in the recipe builder — and after a barcode or menu scan it starts automatically for anything the scan couldn't price.
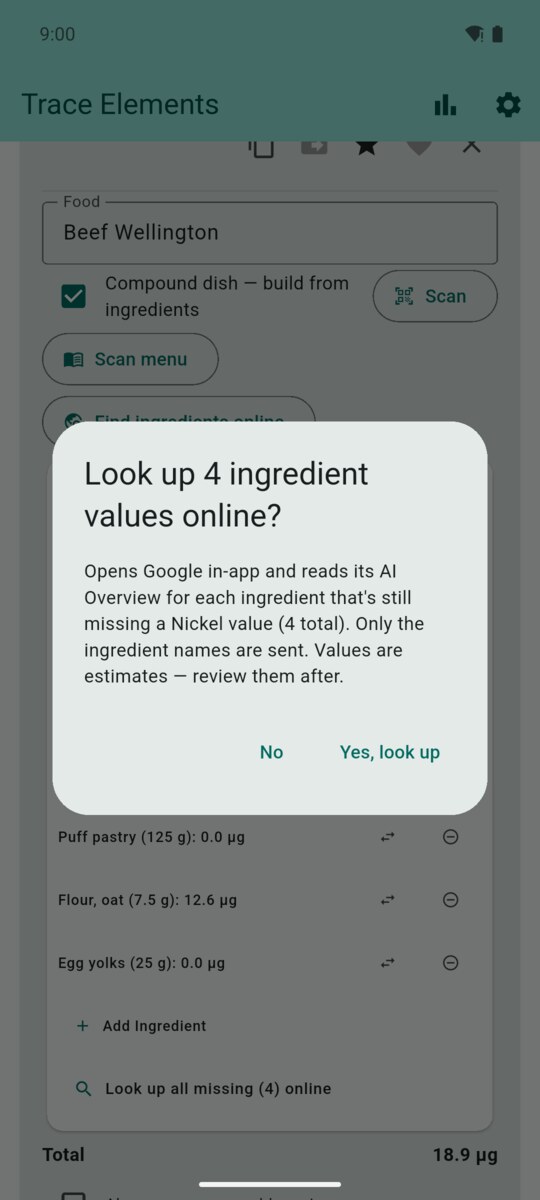
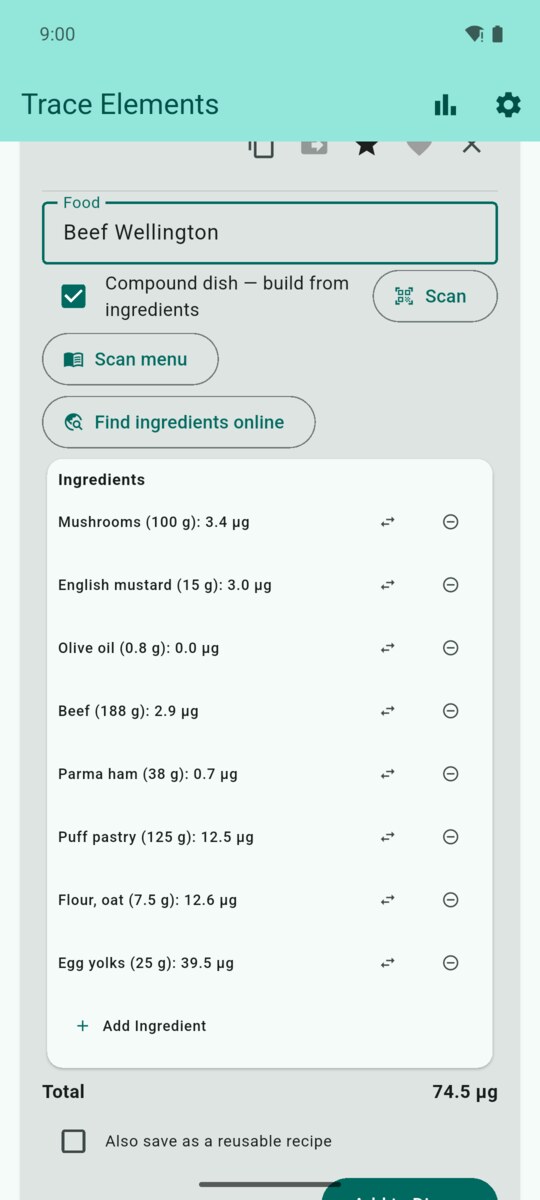
Tick Also save as a reusable recipe before you add the dish and it becomes a searchable food for next time. The same builder lives in Food Management as Prepared dish — look up ingredients online, where the finishing action is Save as recipe instead of adding to a meal.
Your own recipes
Open Food Management → My Recipes.
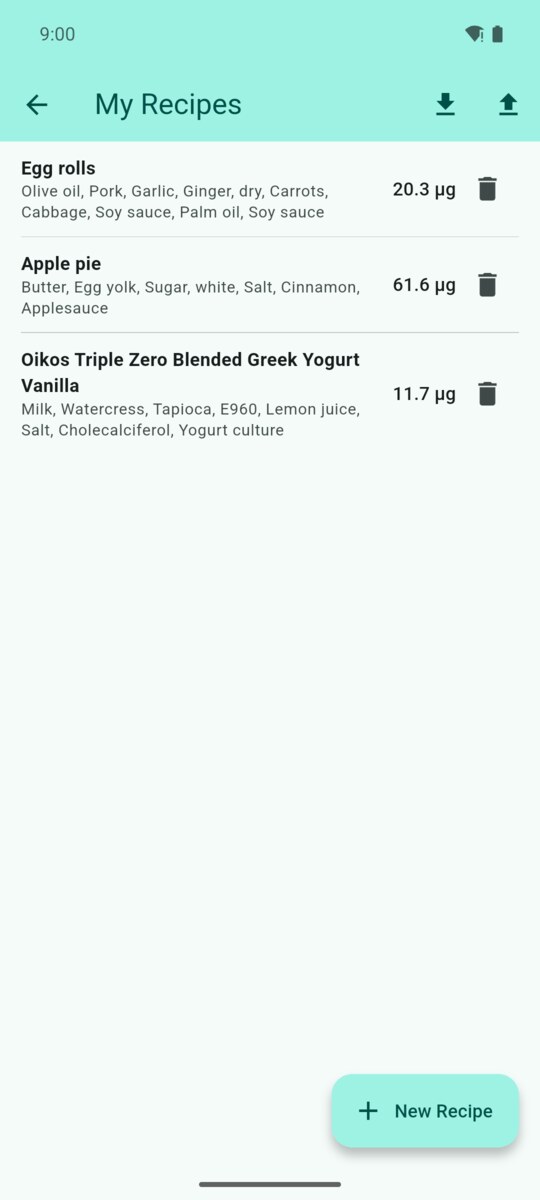
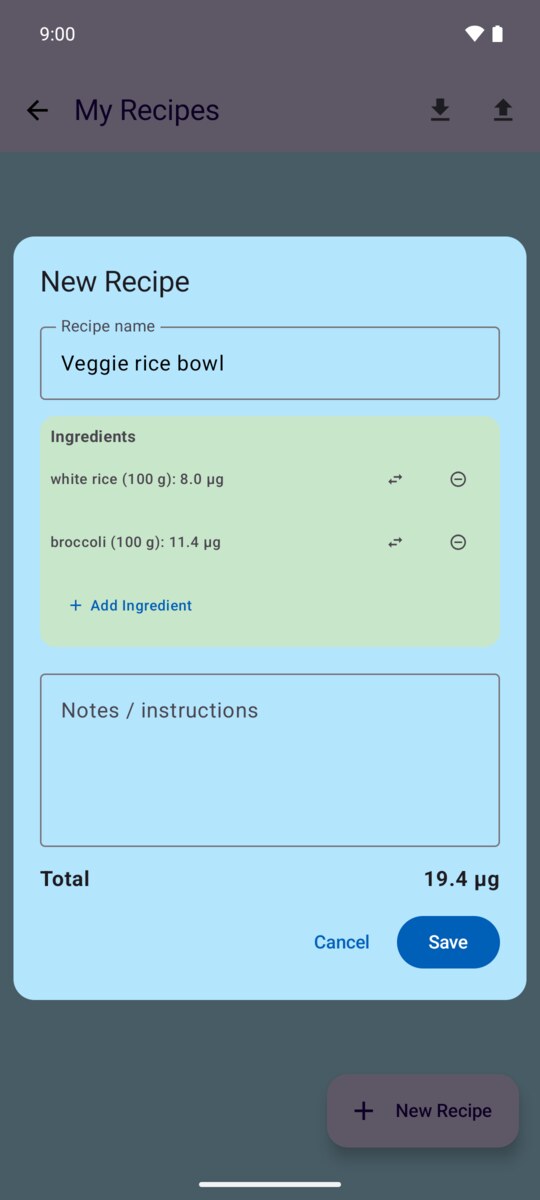
- Tap New Recipe.
- Give the recipe a name — this becomes a searchable food you can log like any other.
- Tap Add Ingredient to build it up. Adjust portions, use the substitute arrows to swap an ingredient for a lower one (the list sorts lowest first), or remove ones you skip.
- Add free-text Notes / instructions if you like, then tap Save.
The dialog shows a running Total so you can see the trade-offs as you tweak the recipe. Saved recipes appear in autocomplete tagged as compound. Tap a recipe to edit it; the trash icon deletes it immediately.
Sharing recipes
The My Recipes screen has import and export icons in its top bar. Export saves your current element's recipes to a single shareable file — just the recipes, not your logs or settings. Import loads a recipe file from someone else (or another device); imported recipes are added alongside your own without overwriting anything, and each keeps the element it was built for, so a nickel recipe's values aren't reinterpreted under a different element. Recipe transfer is free for everyone.
11. Favorites, repeating & moving meals
If you eat the same combination often, you don't have to re-add each food. Every meal card's header carries a strip of reuse controls, left to right:
- The copy icon (Copy this meal from yesterday) pulls the same meal from the previous day into today. It appends to whatever is already there and does nothing if yesterday's meal was empty. Because it works one meal at a time, you can repeat breakfast without dragging in last night's dinner.
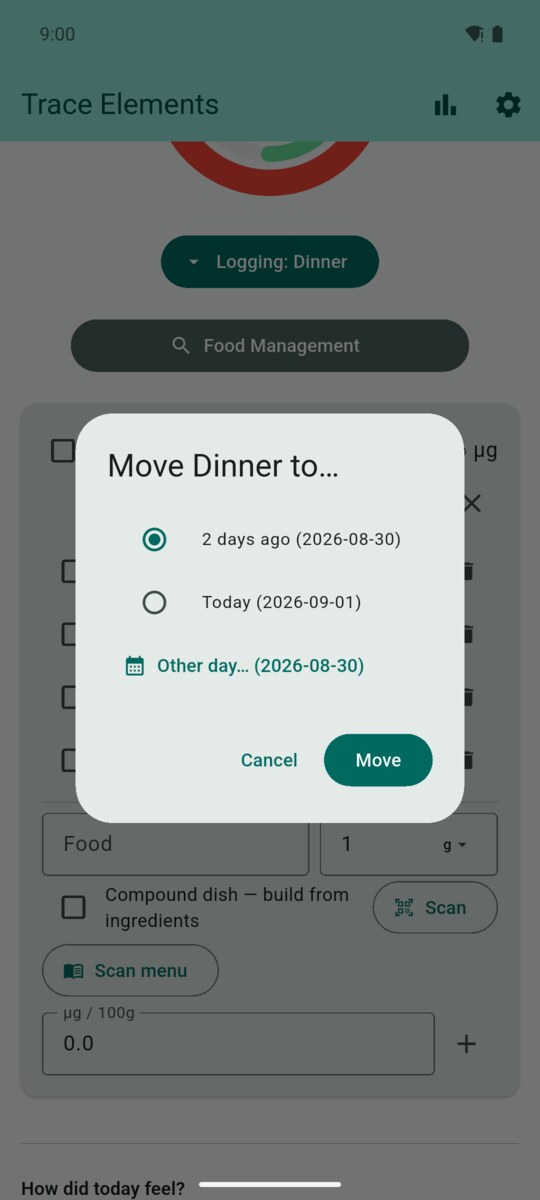
- The move icon (Move this meal to another day) is the one-step fix for a meal logged on the wrong date: choose yesterday or today from the list, or Other day… to pick any date in a calendar, and the whole meal — foods, amounts, and ingredient breakdowns — transfers there. Anything already on the target day's same meal is kept, and both days' moods and notes are untouched.
- The ★ star (Recall Favorites) lets you drop a saved template back into any meal in one tap.
- The ♥ heart (Save Favorite) stores the current meal as a reusable template under a name you choose.
- The ✕ closes the card.
12. Mood & notes journal
Below the meal card, How did today feel? lets you tag the day Good, Okay, or Rough (tap the chosen one again to clear it), and the Notes box captures symptoms, energy, or anything else worth remembering. These travel with the day, so when you review your history you can line up how you felt against what you ate.
13. Trends & history
Tap the bar-chart icon in the top bar to open Trends & History. Toggle between a Week bar chart and a Month calendar, each colored by how the day landed against your Caution and Over-limit thresholds — the same rule the daily ring uses.
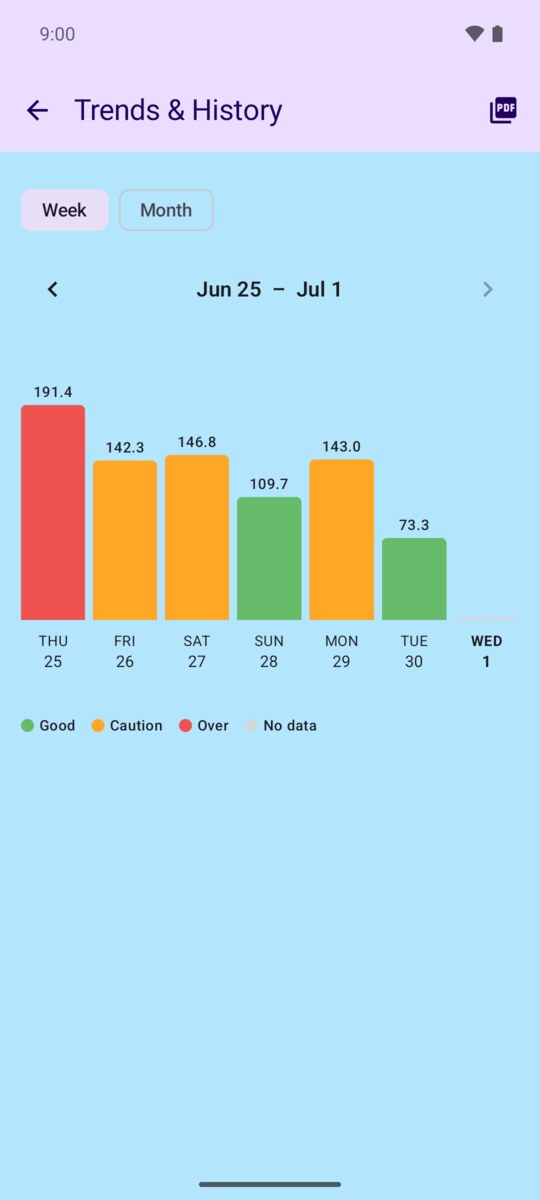
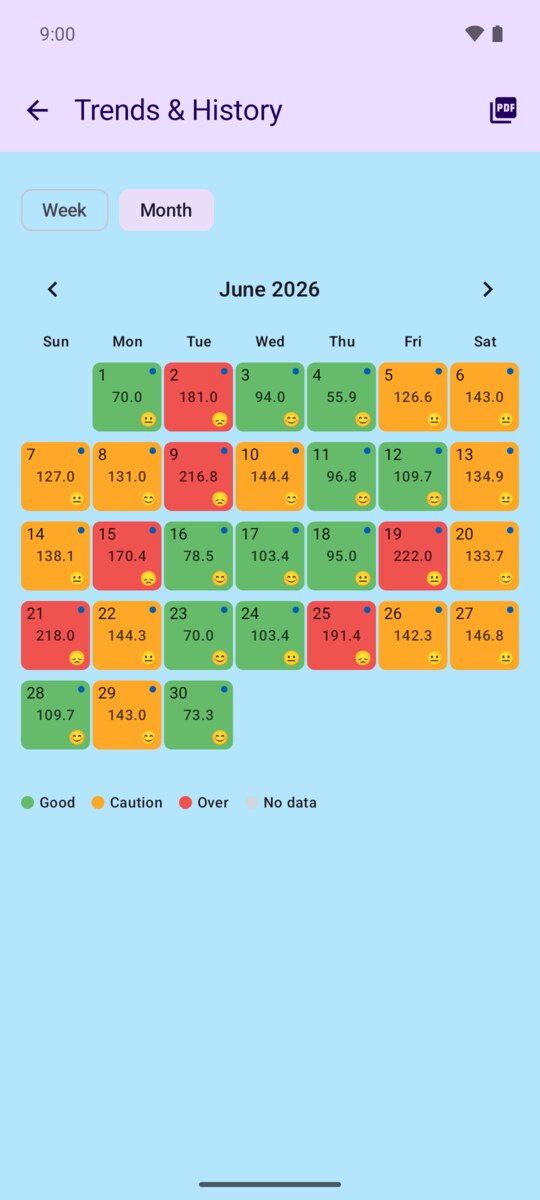
Use the arrows to move between weeks or months. Tap a day to open it on the home screen and read its journal entry alongside the meals. When you track both elements, a day is colored by whichever element did worse, and the month view adds a Ni↑, Co↑, or Ni+Co↑ badge naming it.
Exporting a report for your clinician
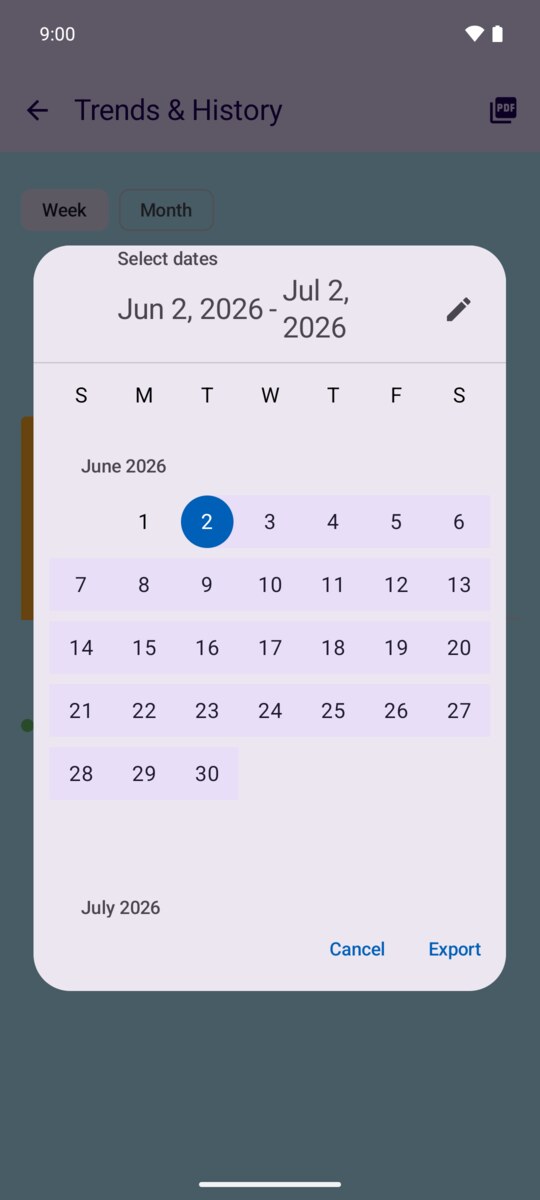
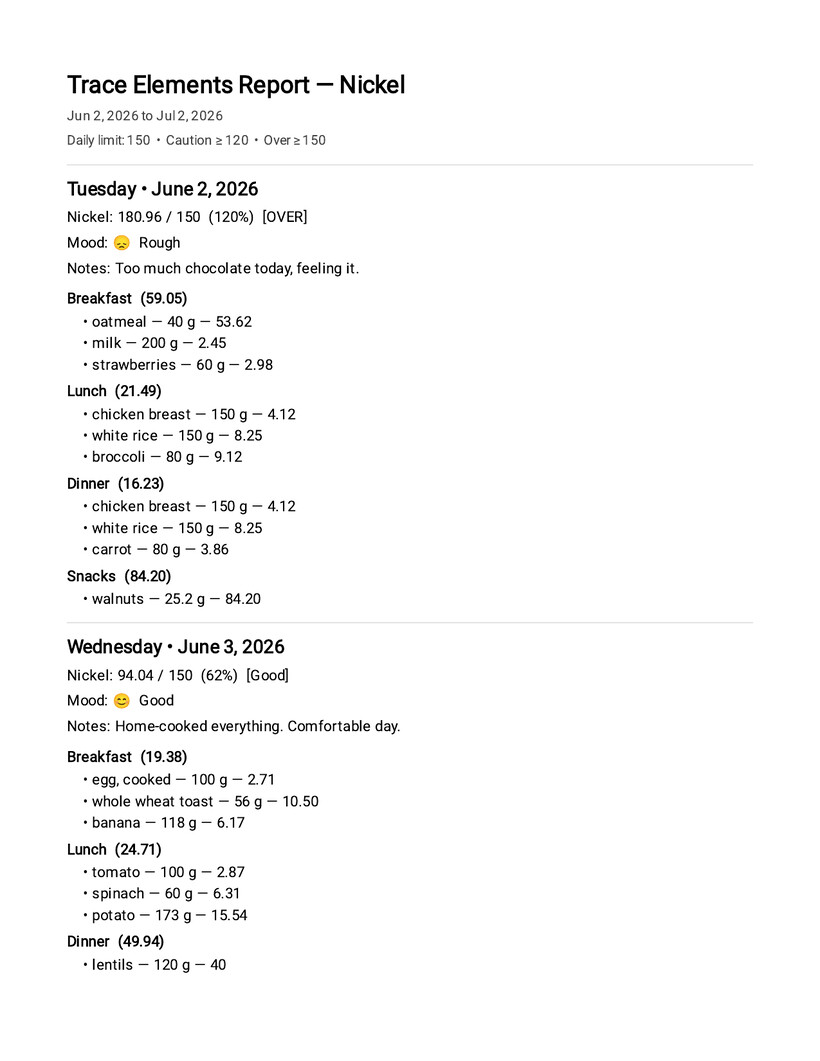
The PDF icon in the top bar builds a report you can save or share — handy to bring to a clinic visit. Tap it and pick a date range (it defaults to the last 30 days), tap Save in the picker, then choose where to store the PDF. PDF reports are part of Pro; devices that had the app before Pro launched keep them free.
14. Settings, limits & backup
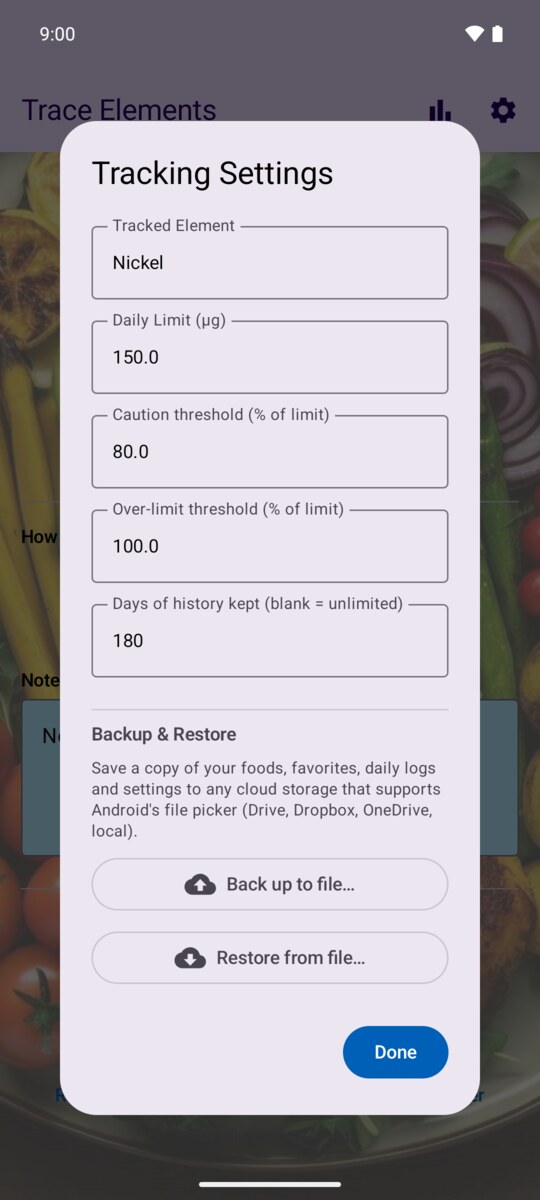
The gear icon opens Tracking Settings.
| Setting | What it does |
|---|---|
| Tracked element | Nickel or Cobalt chips. The chosen element becomes the outer ring and the food list you edit. Cobalt is a Pro feature; without Pro its chip shows a lock. |
| Daily limit | Your target ceiling for the day, per element — switch the chip above to set the other element's limit. Nickel defaults to 150 µg, cobalt to 12,000 ng. |
| Caution threshold (% of limit) | Percent of the limit at which the ring, Trends, and the report turn amber (default 80%). |
| Over-limit threshold (% of limit) | Percent of the limit at which they turn red (default 100%). |
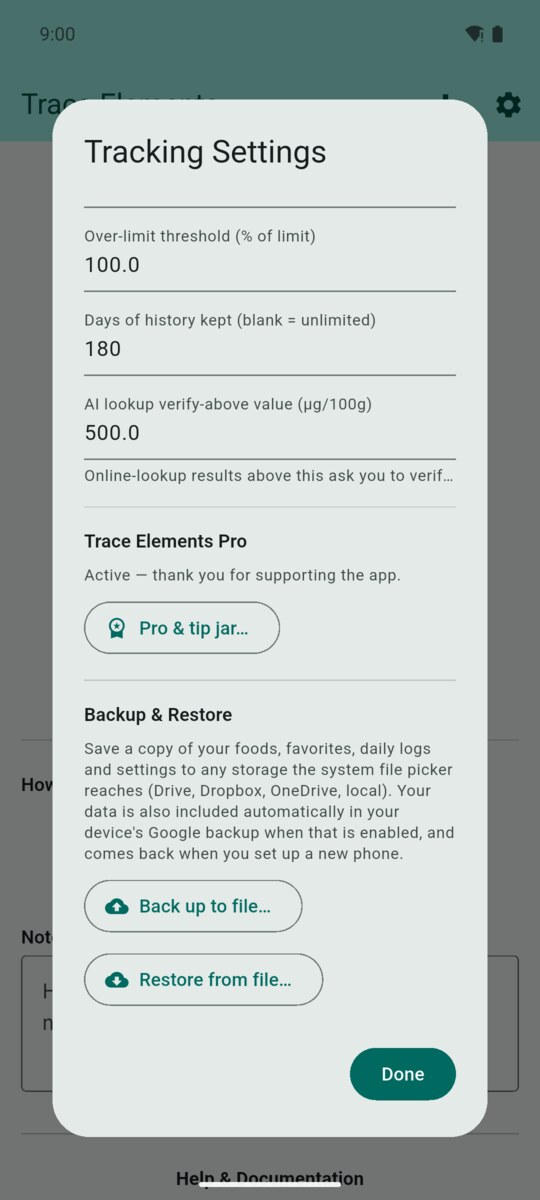
| Days of history kept | How many days of logs to retain (default 180). Leave blank to keep everything. |
| AI lookup verify-above value | Online-lookup results above this (default 500 µg/100g for nickel) are flagged for you to verify against the page before keeping them. |
Backup & restore
Under Backup & Restore, Back up to file… saves a single file containing your foods, favorites, recipes, daily logs, and settings. You can store it anywhere your device's file picker reaches — Google Drive, Dropbox, OneDrive, or local storage. Backup to file is part of Pro; devices that had the app before Pro launched keep it free.
Restore from file… loads a backup back into the app and is never locked. Restoring replaces everything currently in the app — foods, favorites, logs, and settings — so the app asks you to confirm first, and the action can't be undone.
Your data is also included automatically in your device's Google backup when that is enabled, and comes back when you set up a new phone — no file needed. A backup file remains the way to keep a copy you control, or to move data between accounts. To share only your custom recipes, use the import/export buttons on the My Recipes screen instead.
15. Pro & Tip Jar
Open Pro & Tip Jar from the home-screen footer or the Pro & tip jar… button in Settings. Everything you use for day-to-day tracking is free and stays free. Trace Elements Pro ($1.99/month or $12.99/year through Google Play) adds cobalt tracking alongside nickel, menu scanning, PDF reports, and backup to a file. There's no paywall screen anywhere: a locked control shows a lock, and tapping it explains what Pro adds with a Not now button.
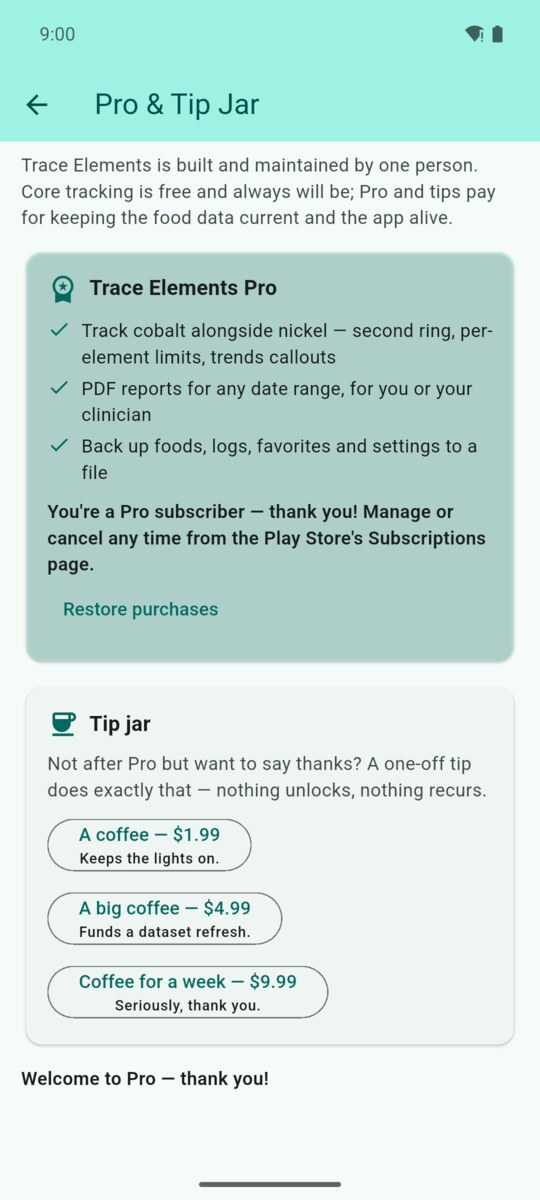
Restore purchases brings Pro back on a new phone signed into the same Google account. The Tip jar offers three one-off thank-yous ($1.99, $4.99, $9.99) that unlock nothing and never recur. See the FAQ for what early users keep for free.